- Download the image from https://beagleboard.org/latest-images
- Extract using 7-zip and you should be able to have a file with .img extension.
- Write using Win32DiskImager.
- As of this writing, there are additional step that needs to be done to enable the eMMC flasher on the image. You need to modify the uEnv.txt
- If you have Windows machine, use VirtualBox and load your favorite Linux distro (LUbuntu on my case)
- Follow these steps extracted from Beagleboard.org: To turn these images into eMMC flasher images, edit the /boot/uEnv.txt file on the Linux partition on the microSD card and remove the '#' on the line with 'cmdline=init=/opt/scripts/tools/eMMC/init-eMMC-flasher-v3.sh'. Enabling this will cause booting the microSD card to flash the eMMC. Images are no longer provided here for this to avoid people accidentally overwriting their eMMC flash.
- Make sure that your BBB is turned off.
- Plug in the SD card.
- Press and Hold S2 button. (Don't let go!)
- Plug in the power.
- Wait for the User LED to flash then about 4 to 5 seconds, release S2 button
- Wait for around 10 to 20 seconds for the User LEDs to do "running LED lights". This is the signal that BBB is flashing.
- Wait for user LEDs to turn off, this is the signal that BBB is finished flashing.
- It will turn off at the end.
- Remove power
- Remove SD card.
- Reapply power.
- Enjoy
Friday, 11 May 2018
Flashing/Upgrading the eMMC of Beaglebone Black (2018)
I am looking for instructions on how to upgrade my BeagleBone Black. Most of the instructions on the web are outdated and doesn't work. Here are the steps I did to upgrade my BBB:

Monday, 30 April 2018
Embedded C++ for MSP430 using IAR compiler
In my current project, I used Embedded C++ for MSP430 using IAR compiler. I re-created an existing assembly project and I was able to reduce the code size from 30KB down to 15KB. Yet, I have more features in my new Embedded C++ firmware. I am very careful with the C++ features that I used due to limited resources (processing power, RAM, FLASH size), the most expensive thing that I used is the virtual method which I essentially needed to implement strategy and template method design patterns. I also used the Instantiator Based Programming Paradigm to eliminate unneeded build times (similar to C++ PIMPL) and to be able to adhere to a good programming principle: "Program to Interface, Not to implementation."
At the end of the project, the code size is small, the code is very expressive, code is unit-testable and the software architecture is very flexible due to application of object-oriented design patterns.
I am very impressed with the IAR C++ compiler.
At the end of the project, the code size is small, the code is very expressive, code is unit-testable and the software architecture is very flexible due to application of object-oriented design patterns.
I am very impressed with the IAR C++ compiler.
Saturday, 31 March 2018
Unit Testing Simple Linux Kernel Module
This morning, I am trying to learn Linux Kernel development from https://blog.sourcerer.io/writing-a-simple-linux-kernel-module-d9dc3762c234 Link .
The examples are very good. However, I am looking for a way to do unit testing and I can't find any info on how to do this. I am a unit test advocate and I fully support unit testing. Why? Because system testing is expensive and from my experience, time-consuming.
I would like to unit test on Eclipse so that I could use Eclipse CDT and GDB's full power in terms of debugging.
With just a few #defines and #ifdefs, I was able to come up with a way to do simple unit tests using asserts. Nothing impressive actually, however the quick feedback of unit tests will be very helpful in getting good code coverage of testing.
I placed the source code demonstration here: Link
For now this will work, however I will be improving this and will be adding a proper unit testing framework.
The examples are very good. However, I am looking for a way to do unit testing and I can't find any info on how to do this. I am a unit test advocate and I fully support unit testing. Why? Because system testing is expensive and from my experience, time-consuming.
I would like to unit test on Eclipse so that I could use Eclipse CDT and GDB's full power in terms of debugging.
 |
| Eclipse Oxygen.3 CDT Release (4.7.3) |
I placed the source code demonstration here: Link
For now this will work, however I will be improving this and will be adding a proper unit testing framework.
Thursday, 29 March 2018
My Less than $4 Faucet Temperature Monitor
This weekend, I was able to finish my temperature monitor.
I just bought the following materials:
- Temperature display with thermocouple from Ebay ($1.50)
- Crayon box from Walmart ($1)
- Electrical tape
I used my Dremel tool to fit the crayon box into my faucet. All in all, I just spent less than $4.
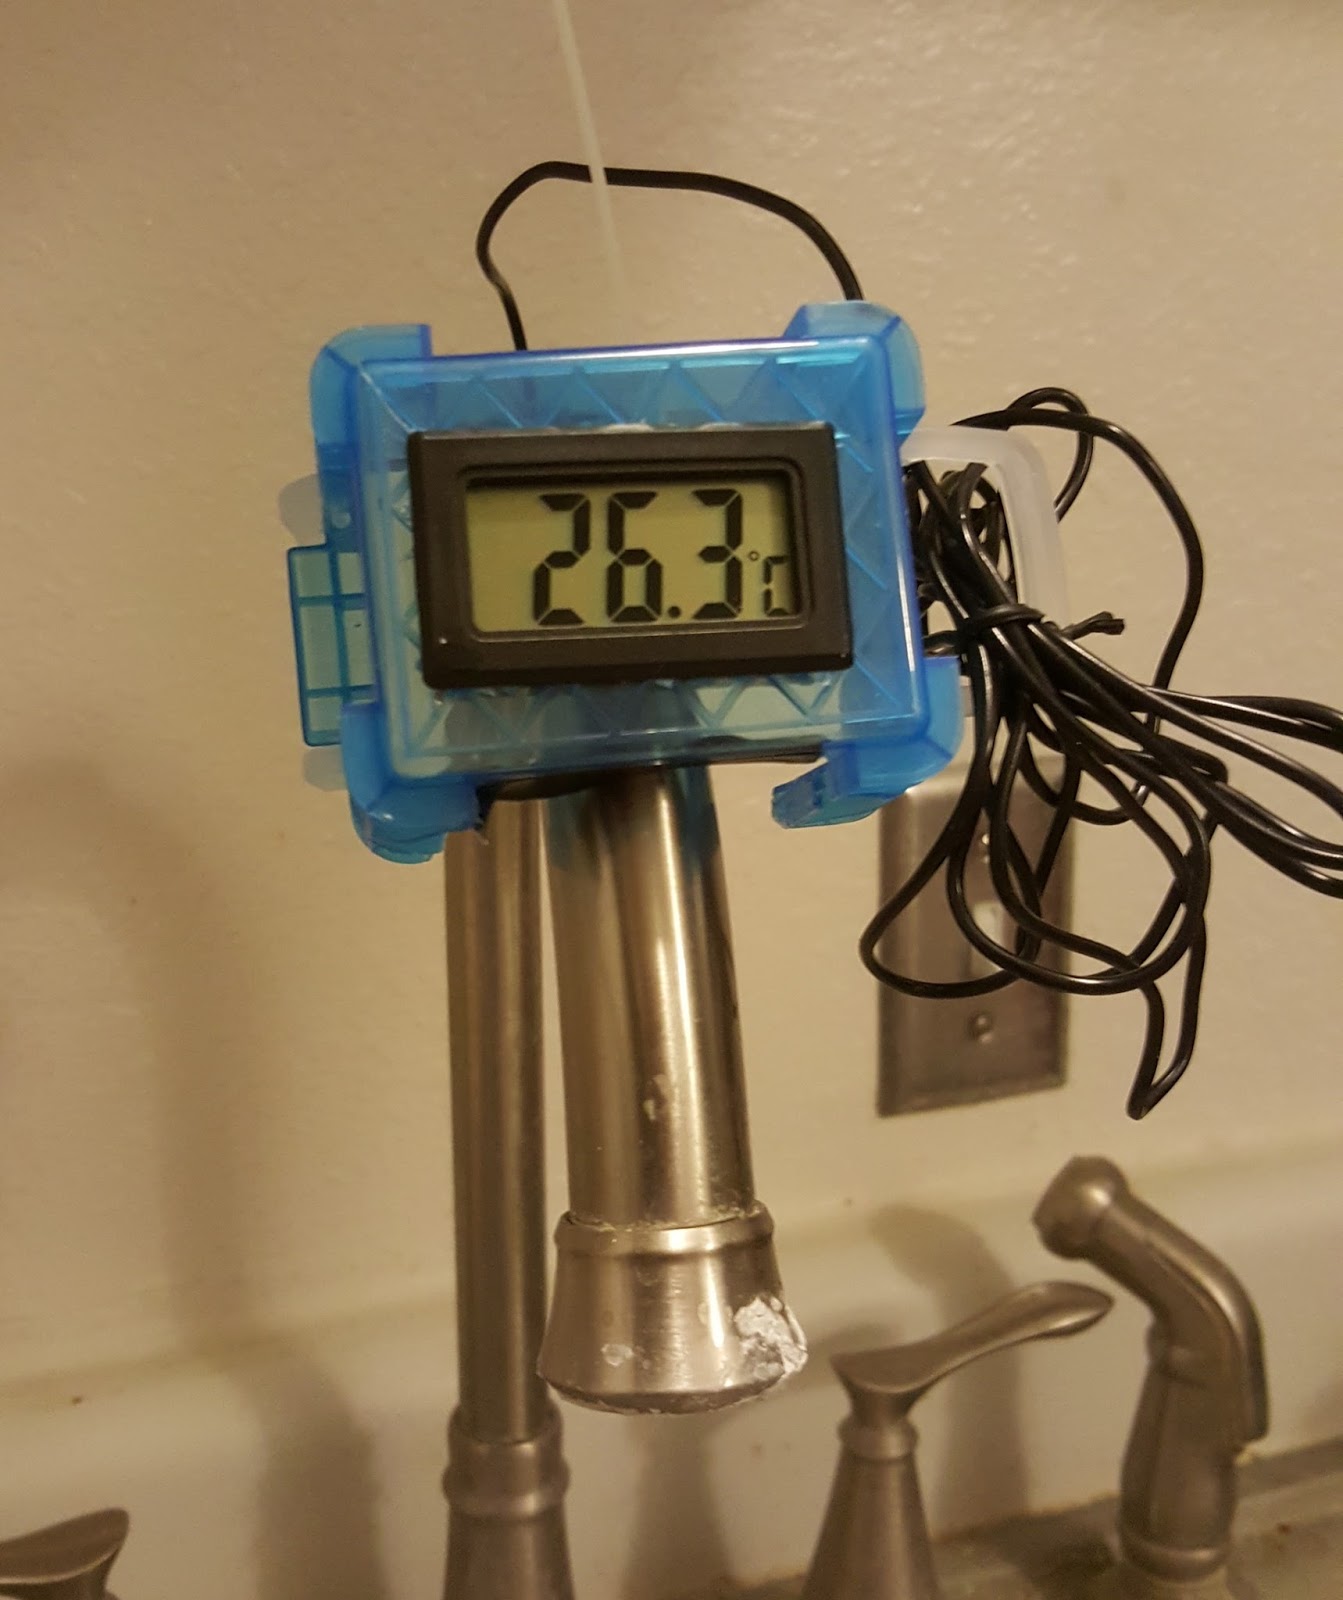 |
| Faucet temperature monitor (I still need to tidy up the wiring LOL) |
I just bought the following materials:
- Temperature display with thermocouple from Ebay ($1.50)
- Crayon box from Walmart ($1)
- Electrical tape
I used my Dremel tool to fit the crayon box into my faucet. All in all, I just spent less than $4.
Saturday, 24 March 2018
Easy Arduino unit testing using Emulare and ArduinoUnit
I just uploaded a video on youtube on How to do Unit Testing on Arduino using Emulare and AndroidUnit. This is purely a simulator unit testing and doesn't require a board, which is great for unit testing.
Saturday, 3 March 2018
Writing NFC app using Cordova for M24LR16 I2C RFID EEPROM - but...
I am in the process of creating an Android app using Cordova with phonegap-NFC plugin. I am interfacing with an RFID I2C EEPROM M24LR16 and my firmware is already ready and tested. I have the sample Android app of ST Microelectronics and the RFID EEPROM works and I can transfer and read data. But after building the Cordova app for 1 hour, it didn't work.
Digging into the documentation, phonegap-nfc doesn't support non-NDEF tags. Most folks are suggesting to modify the phonegap-NFC library for that purpose. It is my first time to work with NFC tag firmware and this is a very good learning experience. I don't know which path to go as of the moment, but I will try to modify the phonegap-NFC library. If it doesn't work out, I will develop the Android app using Android Studio.
Update:
I had just finished creating the Android app using Java (Android Studio). It works great with Non-NDEF NFC tags. :)
Digging into the documentation, phonegap-nfc doesn't support non-NDEF tags. Most folks are suggesting to modify the phonegap-NFC library for that purpose. It is my first time to work with NFC tag firmware and this is a very good learning experience. I don't know which path to go as of the moment, but I will try to modify the phonegap-NFC library. If it doesn't work out, I will develop the Android app using Android Studio.
Update:
I had just finished creating the Android app using Java (Android Studio). It works great with Non-NDEF NFC tags. :)
Sunday, 25 February 2018
LORA: RF SX1278 Review
This weekend, I did a prototype project using LORA SX1278 for a 433MHz project. A friend of mine sent me two XL1278 module.

When I received the modules, I was so excited to test it. I have experience with TI CC1101/CC430 and NRF905 and I would like to do a comparison in terms of development time.
Upon reading the datasheet, everything is very straightforward. With the SX1278 datasheet's help, I was able to develop my C++ SX1278 driver and make it work with TI MSP430 FRAM microcontroller. Unlike, TI CC1101/CC430, I don't need any tool like SmartRF studio to get all the settings. I can just do a register computation for the frequency. Everything is straightforward with this LORA chip.
Since I don't have a spectrum analyzer, I used my $9 USB RTL-SDR (Software Defined Radio) to capture signals in the air.

 |
| Spektrum Interface (not an actual picture from my experiment) |
Continuing with my experiment, when there is no one transmitting, RSSI levels are at -137dBm. I tried transmitting something (I used Spreading Factor of 7 and I am transmitting 128 packets in one shot) and the receiver got a 128byte packet at -19dBm. That is pretty impressive. I haven't done my Friis equation transmission equation analysis yet but looking at this data, I believe we can achieve very far range with this one.
This is a very good module. However, I may need to try some other antenna and I may need to design a quarter wave monopole antenna by hand before doing our range test.
-Jeff
(I don't own any of the picture, please see the link)
Image from: https://www.ebay.com/itm/433-LoRa-SX1278-Long-Range-RF-Wireless-Transceivr-Module-SX1276-5Km-For-Arduino-/322929644930
https://www.rtl-sdr.com/spektrum-new-rtl-sdr-spectrum-analyzer-software/
Friday, 9 February 2018
Textwrap: Impressive python module
I am currently reverse-engineering an audio analysis algorithm which computes for the statistical variance. I needed to get around 100,000 A/D data points from the MSP430's FRAM microcontroller so that I can inject it to my unit test. With that, IAR gives me a TI-TXT format.
example:
@10000
30 20 40 50
60 70 80 90
I needed to convert this to a C array so that I can place this inside my C++ code. Here are the steps I did:
1. I extracted all the data and placed them inside a list which is very easy to do using split, appending "0x" and using join. The output will be like this:
"0x30, 0x20, 0x60" so on so forth
2. My problem with the above string is that it will take only one line of my C++ code which I feel won't look nice as I don't want to be scrolling horizontally as much as possible. I thought of creating a python algorithm to put newlines nicely without cutting a whole string like:
0x30, 0x20 ,0x
60, 0x70, 0x8
0, 0x20
Then I discovered python already covers it for me via textwrap module which I think is a smart algorithm. So now, I won't have any broken string and it will be printed nicely:
0x30, 0x20 ,0x60,
0x70, 0x80, 0x20
More information on how to use it here: https://pymotw.com/2/textwrap/
example:
@10000
30 20 40 50
60 70 80 90
I needed to convert this to a C array so that I can place this inside my C++ code. Here are the steps I did:
1. I extracted all the data and placed them inside a list which is very easy to do using split, appending "0x" and using join. The output will be like this:
"0x30, 0x20, 0x60" so on so forth
2. My problem with the above string is that it will take only one line of my C++ code which I feel won't look nice as I don't want to be scrolling horizontally as much as possible. I thought of creating a python algorithm to put newlines nicely without cutting a whole string like:
0x30, 0x20 ,0x
60, 0x70, 0x8
0, 0x20
Then I discovered python already covers it for me via textwrap module which I think is a smart algorithm. So now, I won't have any broken string and it will be printed nicely:
0x30, 0x20 ,0x60,
0x70, 0x80, 0x20
More information on how to use it here: https://pymotw.com/2/textwrap/
Saturday, 3 February 2018
Why TortoiseGit is so amazing
I had been using Git for a very long time and this is the best version control system that I ever used. In the past, I used centralized version control system: CVS, SVN, Visual SourceSafe, and TFS. I heavily use TortoiseGit and I use git bash only if the feature isn't there on TortoiseGit . I also develop in Linux and I used Samba share drive or VirtualBox network share to be able to access my source code outside of Linux, so that I could use TortoiseGit on my codes.
Here is how Git changed my development style and quality of my code:
These are the things that I really like in TortoiseGit which I had been using for many years. It is very simple and yet powerful.
Here is how Git changed my development style and quality of my code:
- Personal code review before committing - In TortoiseGit, it is very easy to see the diff of your current code change and the last commit via the included UI diff tool (I also use an external tool called WinMerge which is more faster). This diff will direct me to the exact place where I did my modification and this gives me a chance to have a second look if I accidentally forget or misplace something like reverting some debug compilation symbols that shouldn't be on production release.
I noticed that git bash users (at least from the people that I know of) never do personal code reviews before committing and I think it is because it is not very straightforward to do so like in Tortoisegit. There was a project in my previous company where the developer unintentionally added a code which made the software release very unstable. They found out that some test snippets were included on the commit. A quick review of the software before commit will save tons of headaches. - Stash - I love this feature. This helps me move through different git branches without committing my modified file and instead stash saving it and popping it out if I need to continue working on the modified files.
- Reviewing codes from other committers - It is very easy to review code from other committers via git log compare revision on TortoiseGit. This helps me review other developers work.
- Revert on TortoiseGit - whenever I do code review, and if I see that some of the codes needs to go back to its original state, I can just simple do a revert on the commit windows dialog box of TortoiseGit.
- Very easy to merge codes
- Bisect - I used this only once. But bisect feature is very impressive.
- Distributed- being distributed is a very very very very very good thing. I commit often and sometimes, I don't have an internet connection. With this, I can commit anytime and once I have an internet connection, then that's the time I can push to the git server.
These are the things that I really like in TortoiseGit which I had been using for many years. It is very simple and yet powerful.
Saturday, 4 November 2017
Friday, 20 October 2017
Android Voice Controlled Servo Motor Controller : IOT Version using ESP8266
Last week, I created a Voice Controlled Servo Controller using Bluetooth HC-05. This week, I created an IOT version of the Voice Controlled Servo Controller.
Used Strategy Design Pattern (both on Python and C++) to achieve flexibility to switch between the Bluetooth module and ESP8266 module.
Sunday, 15 October 2017
Android Voice Controller Servo Motor Controller using Bluetooth
This is a voice controlled servo motor controller. I created this just for fun. I used the following:
Arduino Mega
Arduino IDE C/C++
Android Speech to Text
Bluetooth to Serial using Serial Port Profile
Bluetooth to Serial using Serial Port Profile
Python SL4A
Servo Motor
Saturday, 7 October 2017
Embedded Linux: Buildroot and BeagleBone
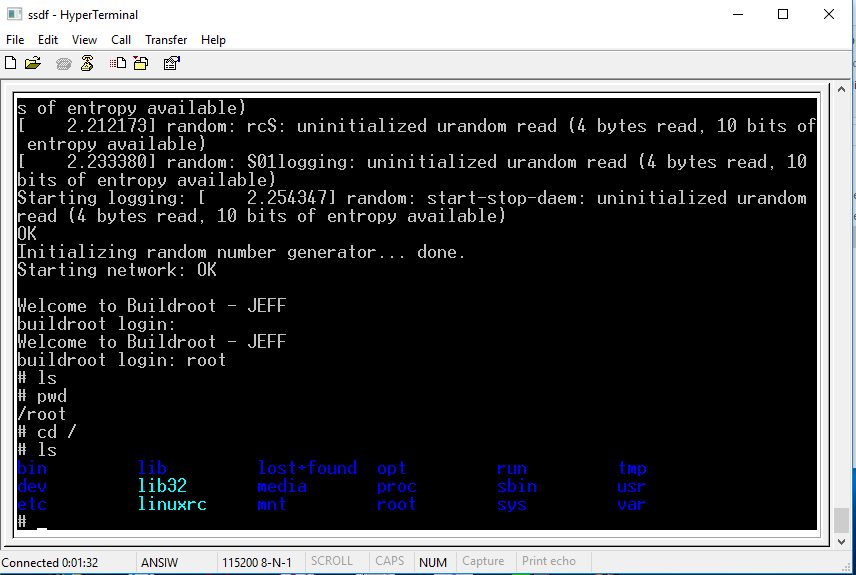 |
| Buildroot for BeagleBone Black - Hyperterminal @ 115200bps |
I posted the whole procedure on my youtube: https://www.youtube.com/watch?v=QLzGKIx9Mz8
I used LUBuntu because it is more lightweight compared to the main Ubuntu distribution.
Monday, 2 October 2017
Test Driving: nRF24L01 + my observations vs CC1101

I am currently trying the nRF24L01 and it is very easy to use. In as little as 30 minutes I was able to make the two modules communicate with each other. I had just started playing with it since yesterday and one thing that I am looking for is an RSSI readout. Unfortunately, this only has a boolean return value for the Received Power (RPD). If received power levels are more than -64dBm, you will get a 1, less than that, you will get 0. In CC1101, I can get the absolute value of the RSSI and convert it to dBm accurately.
I used the steps on this link to setup my nRF24L01.
Sunday, 3 September 2017
Vicks Humidifier Modification: Adding a Humidity Controller with Hysteresis
First, I opened the Vicks Humidifier and checked all the circuit inside and I did my first prototype and sensor characterization on an Arduino Mega 2560.
 |
| Unmodified circuit |
 |
| Arduino Mega Prototype with DHT-11 |
Next,
Next, I modified a couple of things inside the Vicks humidifier. I only have 24V DC on the board and I planned on using an Arduino Mini. I checked Arduino Mini's schematic and it uses MIC5205 regulator. From MIC5205's datasheet, normal operation for Vin is from 2.5V to 16V. Since I don't have any regulator in my hand, I just created a 12V power supply using P2N2222A in emitter follower configuration with voltage divider in it. I used this 12V to power my Arduino Mini.
Next, the float switch needs to connect 24V to certain part of a circuit. I modified this and since I don't like to use a relay in this scenario and I want this be have a lower power consumption, I created a PNP/NPN combo to deliver the needed 24V on a part of Vick's circuit and this triggers the ultrasonic mist generator and the internal fan.
 | |
| Almost Complete |
Now it is working. I implemented a hysteresis from 50% to 60% of humidity.
 | ||
| Arduino Mini Mounted |
 |
Saturday, 26 August 2017
GDB Remote Debugging using LUbuntu Linux and Eclipse CDT Neon 3
I just uploaded a video for GDB debugging using LUbuntu and Eclipse Neon 3.
Saturday, 19 August 2017
1st Time to Join a Hackathon : Lessons Learned
I recently joined a 1-day Hackathon and we were two on the team. There are lots of lessons learned. I will also place comments in italics on how we are doing on every items.
YOU NEED TO KNOW THE SPONSORS AND THEIR NEEDS.
The main sponsor of the Hackathon are doing web apps. And we did a mobile app. All the winners created websites. No mobile apps won on that hackathon. If you would like to win, create a solution AND use a technology that would be inline with their business needs as much as possible.
After that Hackathon, I was too tired. Although it was a good experience. Now, I know what to expect on our next Hackathon.
- Make sure majority of the tools are installed on your PC. Or, at least, the installers should be on your PC. Downloading the installers and installing them will eat some precious time. We are very prepared when we came to the venue.
- The moment the organizers give the Challenge Statement, brainstorm. Refrain from doing any coding. As I have project management background, we were able to come up with a good game plan and a solution to the Problem Statement.
- Make sure you are familiar with Git. You don't have to be an expert in Git. You must at least know how to clone, push, pull, and commit. If you are new to Git, use a UI tool like TortoiseGit.
- Work incrementally. Whenever you have a working code, ALWAYS COMMIT TO GIT! That means having more than 3 commits per hour.
- Take frequent short breaks. As I am the sole developer, I need this because of the stress on the time limit.
- Respect the developer's time. When I was coding and debugging something, my partner keeps on giving suggestions that is not on the context of the problem we are currently solving; therefore, I wasn't able to absorb a thing he is saying since I am focused on doing something.
- Try not to panic when something is wrong. On my case, I did panic at around 3:45PM. I though my software is not working, but when i figured out, the online JSON viewer is showing me the JSON on a wrong way. The data was represented like this: Data1,Info1,Data2,Info2. Due to the constant pressure, I missed that and I thought it was Info1,Data1,Info2,Data2. Try to take note of the details of the datasets in case you are working on Open Data.
- There will be different kinds of people on the venue. Remember the panic that I had on the previous item? When I was dealing with it, some of the people on the other team are celebrating on how good their system was. I panicked crazily. If you are like me, make sure to bring headphones and listen to some MP3 songs. This will help you avoid hearing other people and avoid more panic.
- After you are done, make sure to talk to some other teams and be friendly. If you ask questions on what they did, they will most of the time give you an overview on what they did and you will see how proud they are of their work. You will also learn from them.
- Enjoy the foods!
YOU NEED TO KNOW THE SPONSORS AND THEIR NEEDS.
The main sponsor of the Hackathon are doing web apps. And we did a mobile app. All the winners created websites. No mobile apps won on that hackathon. If you would like to win, create a solution AND use a technology that would be inline with their business needs as much as possible.
After that Hackathon, I was too tired. Although it was a good experience. Now, I know what to expect on our next Hackathon.
Sunday, 25 June 2017
Review Comparison: Keweisi and USB Charger Doctor
I am currently evaluating two USB voltage/current tester : Keweisi and USB Charger Doctor.


Here is the data from the picture above:
My trusty Digital Multimeter - 8.87V
Keweisi: 8.99V/1.53A
USB Charger Doctor: 7.49V/1.50A
As some of you will wonder, why the voltage reaches more than 5V? This is because of Samsung's Fast Adaptive Charger, and it can go up to more than 5V. There are good explanations here: Link
Here, the charger switches up to to near 9V. Both the current on two USB voltage/current measurement device are almost identical so let's assume they are both ok. BUT, the voltage are different. It seems to me that the upper limit for the USB charger doctor is only up to 7.5V.
Conclusion:
Keweisi is the clear winner here. It can display the voltage and current at the same time and it can measure more voltage than the USB Charger Doctor.

Here is the data from the picture above:
My trusty Digital Multimeter - 8.87V
Keweisi: 8.99V/1.53A
USB Charger Doctor: 7.49V/1.50A
As some of you will wonder, why the voltage reaches more than 5V? This is because of Samsung's Fast Adaptive Charger, and it can go up to more than 5V. There are good explanations here: Link
Here, the charger switches up to to near 9V. Both the current on two USB voltage/current measurement device are almost identical so let's assume they are both ok. BUT, the voltage are different. It seems to me that the upper limit for the USB charger doctor is only up to 7.5V.
Conclusion:
Keweisi is the clear winner here. It can display the voltage and current at the same time and it can measure more voltage than the USB Charger Doctor.
Saturday, 10 June 2017
Instantiator Based Programming Paradigm (C++)
Recently, I had an issue putting the uWebsockets data type on my
project's headers. There were so many compiler errors by just including the datatypes
of uWebsockets to my project's header file. Placing both the class
declaration and definition inside the cpp source code file resolved the
issue. But the next question is how will I instantiate the uWebsockets
outside, this is where the instantiator came in.
I discovered by accident, and I like this new paradigm of programming. This way, everyone will be forced to do a very important principle: “Program to Interface, not to an Implementation.” And I don't need to switch to header and source everytime. I can just use the IDE's split window capability to easily edit the declaration and definition. I know this will challenge the norm because we normally separate the declaration and definition to the header and source code file. But I am ready to take criticisms and I will adjust if necessary. But as of this writing, I don't see any disadvantage and instead I only see advantages.
To illustrate here is a very simple source code on how I did it:
Websocket.cpp – Both the class declaration and definition are located here. At the end, you will see the instantiator. It will return an abstract base class pointer.
Websocket.h - This will contain only the instantiator functions.
AbaseWebSocket.h - This the abstract base class that websocket class will inherit.
main.cpp - Demonstration of how to use it.
The instantiator can produce new instances or it could produce a static instance (aka Singleton).
Again, this way, everyone will be forced to do a very important principle: “Program to Interface, not to an Implementation.” Because there is no way for you to be able to instantiate a concrete class because they will all be inside the cpp file, thus you need to go to the necessary abstractions.
Source Code Link
I discovered by accident, and I like this new paradigm of programming. This way, everyone will be forced to do a very important principle: “Program to Interface, not to an Implementation.” And I don't need to switch to header and source everytime. I can just use the IDE's split window capability to easily edit the declaration and definition. I know this will challenge the norm because we normally separate the declaration and definition to the header and source code file. But I am ready to take criticisms and I will adjust if necessary. But as of this writing, I don't see any disadvantage and instead I only see advantages.
To illustrate here is a very simple source code on how I did it:
Websocket.cpp – Both the class declaration and definition are located here. At the end, you will see the instantiator. It will return an abstract base class pointer.
Websocket.h - This will contain only the instantiator functions.
AbaseWebSocket.h - This the abstract base class that websocket class will inherit.
main.cpp - Demonstration of how to use it.
The instantiator can produce new instances or it could produce a static instance (aka Singleton).
Again, this way, everyone will be forced to do a very important principle: “Program to Interface, not to an Implementation.” Because there is no way for you to be able to instantiate a concrete class because they will all be inside the cpp file, thus you need to go to the necessary abstractions.
Source Code Link
Saturday, 27 May 2017
Getting Started: Altera Quartus / Python MyHDL / MAX-II CPLD / USB Blaster
Here is a short video on how to use Python MyHDL with Altera Quartus
https://www.youtube.com/watch?v=nj61a2VXG-w
https://www.youtube.com/watch?v=nj61a2VXG-w
Subscribe to:
Posts (Atom)